How To Fix Dying Light 2 Audio Bug? [Answered]
Open-world, narrative-driven video game Dying Light 2 will also feature multiplayer so that up to four players can work together to complete the plot. Up to four people can play the story. Reloading your save game is the first step after quitting the main interface.
The sound issue in Dying Light 2 should resolve after you restart the game. Try completely quitting the game, relaunching it, and loading your save game if this is not your situation. If Dying Light 2’s Steam version gives you sound problems, you’ve come to the right spot.
Numerous reports are pouring in about this. So, relax; you are not alone. This article explains how to fix dying light 2 audio bugs.
What Is Dying Light 2 Audio Bug Xbox?
Although the audio bug in Dying Light 2 is annoying, it is fortunately also simple to repair. The bug causes lines of speech spoken during cutscenes and regular gaming to skip randomly.
It makes it difficult to fully comprehend some discussions, which hurts the narrative because important information passes along without a chance to hear back. The dying light 2 buzzing noise Xbox can doom every discussion since it happens randomly.
How To Fix Dying Light 2 Audio Glitch?
Your Computer’s manufacturer chose the Nahimic Audio Driver to improve the audio quality on motherboards, laptops, and other hardware. It is a reliable driver designed to improve and fine-tune your computer’s audio capabilities.
- You must access Task Manager by pressing Ctrl+Shift+Esc, then go to Launch.
- The Nahimic audio driver should now remove from the list.
- Restart the device once more to see if the issue resolve.
How To Fix Dying Light 2 Sound Bug Xbox Series X?
Fortunately, fixing this problem doesn’t involve a major hassle; all that’s needed is a complete game restart. Simply quit the game when the problem arises, then start again, and the problem should resolve. The problem is presently present on every game version, and this fix is compatible with the PC, PlayStation 4, PlayStation 5, Xbox One, and Xbox Series X|S versions.
How To Fix Dying Light 2 Ps4 Audio Issues?
It’s important to note that users of Realtek Audio Driver can readily download and install the most recent version of the audio driver for your particular motherboard or laptop model by visiting this article link. Alternatively, you can update the current graphics driver on your Windows computer by simply following the steps below.
- To access the Quick Link Menu, press the Windows + X buttons.
- Double-click Sound, video, and game controllers after clicking Device Manager to launch it.
- Update the driver by performing a right-click on the current or problematic audio device.
- Select Automatically search for chauffeurs and then wait for the procedure to finish.
- The system will immediately check for updates and install them if any are available.
- After finishing, make sure to restart the computer to implement the changes.
How To Fix Dying Light 2 Audio Cutting Out PS4?
You should attempt deleting the Dying Light 2 Config file from your computer to see if the problem resolve. To do this:
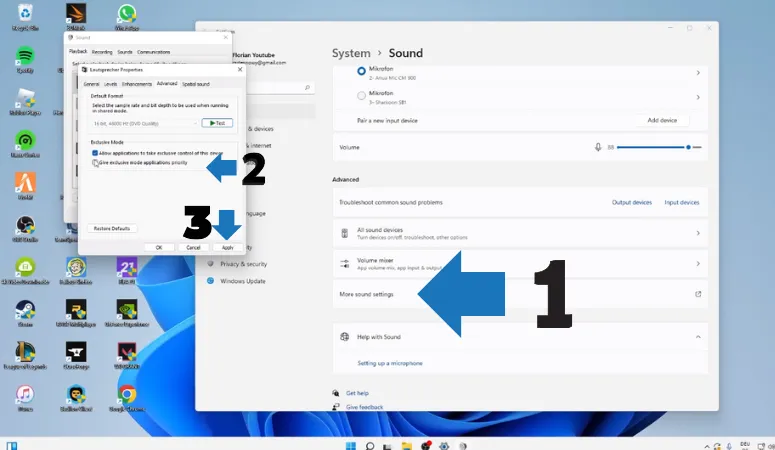
- Setting up the Stereo Sound Setup
- On the taskbar, right-click the Speaker symbol.
- Select Music.
- On the Playback page, click.
- Next, select Customize.
- Select the Surround audio channel, then select Next.
- Check the speakers.
- The configuration procedure will end once you click Finish.
Just follow the directions above method if you need to upgrade your drivers.
How To Fix Dying Light 2 Audio Issues?
If your headphones have a USB connection, take the following actions:
- Connect the headphones first to your computer.
- Next, perform a right-click on the taskbar’s Speaker symbol.
- Select Music.
- On the Playback page, click.
- Select right-click on your gadget.
- Select Locations.
- Change Preferences by clicking it.
- Choosing the Driver option.
- Select Install Driver from the menu.
- From the files on your computer, select the driver.
- Next, select the USB Microphone Device option and press Next. The software will then install.
- Reboot your computer.